How to Remove Email Account From Outlook 365
Microsoft 365 cheat sheets
Outlook for Microsoft 365 cheat sheet
Learn to use the best new features in Outlook for Microsoft 365/Office 365 in Windows.
![]() By
By
Contributing Editor, Computerworld |
![Computerworld Cheat Sheet > Microsoft > Outlook [Office 365]](https://images.idgesg.net/images/article/2019/02/cw_microsoft_office_365_outlook_cheat_sheet-100787153-large.jpg?auto=webp&quality=85,70)
Show More
There are countless ways to communicate electronically, including texting, social media, collaboration apps like Teams and Slack, and video software such as Zoom and Skype.
Given the myriad ways you can get in touch with others, you may well think email is dead.
Think again.
Email, the mainstay of workplace communications, is stronger than ever. An estimated 306.4 billion emails were sent every day in 2020, according to Statista — a figure that the market research firm expects to grow to 376.4 billion daily emails by 2025.
If you're using an email client rather than a cloud-based email service, there's a very good chance that you're using Microsoft Outlook, the most popular Windows-based piece of email software. Although you may have been using Outlook for some time, you might be missing out on some of its worthwhile features.
Microsoft sells Office under two models: Individuals and businesses can pay for the software license up front and own it forever (what the company calls the "perpetual" version of the suite), or they can purchase an Office 365 or Microsoft 365 subscription, which means they have access to the software for only as long as they keep paying the subscription fee.
When you purchase a perpetual version of the suite — say, Office 2016 or Office 2019 — its applications will never get new features, whereas Office 365 apps are continually updated with new features. (For more details, see "Microsoft Office 2019 vs. Office 365: How to pick the best one for you") Confusing matters even more, Microsoft has recently renamed some, but not all, of its Office 365 subscriptions under the "Microsoft 365" moniker, which generally means the plan includes everything from the old Office 365 plans plus some additional features and apps.
This cheat sheet gets you up to speed on the features that have been introduced in the Windows desktop client for Outlook in Office 365 and Microsoft 365 since 2015. We'll periodically update this story as new features roll out. (If you're using the perpetual-license Outlook 2016 or 2019, see our separate Outlook for 2016 and 2019 cheat sheet.)
Share this story: IT folks, we hope you'll pass this guide on to your users to help them learn to get the most from Outlook for Microsoft 365/Office 365 in Windows.
Use the classic or simplified Ribbon
The Ribbon interface that you came to know and love (or perhaps hate) in earlier versions of Outlook has gotten a nice tweak for those who prefer simplicity to an everything-but-the-kitchen-sink look. You can now use a simplified Ribbon that shows only the most frequently used features, rather than the full panoply of what's available to you in Outlook. You can switch back and forth between the new simplified Ribbon and the classic one with a single click.
(Because the Ribbon has been included in Office applications since Office 2007, we assume you're familiar with how it works in general. If you need a refresher, see our Outlook 2010 cheat sheet.)
 IDG
IDG For those who like the "everything-but-the-kitchen-sink" look, the classic Ribbon is still available in Outlook. (Click image to enlarge it.)
To switch from the classic Ribbon to the simplified one, click the small down arrow (also called a caret) in the lower right-hand corner of the Ribbon. The Ribbon narrows considerably and shows only the most common tasks you need to do, giving you more screen real estate to do your actual work. To get the classic Ribbon back, click the caret again (it's now upfacing).
 IDG
IDG Here's the stripped-down, simplified Ribbon, which shows only the most commonly used commands. (Click image to enlarge it.)
However, you don't necessarily have to go back to the full, classic Ribbon if you are looking for a specific task. If a button on the simplified Ribbon has a caret on it, you can click it to see a drop-down menu with related tasks. There's also a three-dot icon at the right end of the Ribbon; click it and a drop-down menu appears with several tasks you might want to do related to the Ribbon tab you're currently on — for example, managing junk mail if you're on the Home tab. Select the task you want to do, and you're set.
You can also add any task from the drop-down menu to the simplified Ribbon itself. Right-click any of them and select Pin to Ribbon to do it.
To find out which commands live on which tabs on the Ribbon, download our Outlook for Microsoft 365 Ribbon quick reference. Also note that you can use the search bar above the Ribbon to find commands, as I'll discuss in the next section of this story.
As in previous versions of Outlook, if you want the Ribbon commands to go away completely, press Ctrl-F1. (The tabs above the Ribbon stay visible.) To make them reappear, press Ctrl-F1 again. That works for both the simplified Ribbon and the classic one.
You've got other options for displaying the Ribbon as well, and these options also work with both the simplified and classic Ribbons. To get to them, click the Ribbon Display Options icon at the top right of the screen, just to the left of the icons for minimizing, maximizing, and closing Outlook. From the drop-down menu, you can choose Auto-hide Ribbon (hide the entire Ribbon, both the tabs and commands underneath them), Show Tabs (show the tabs but hide the commands underneath them, as when you press Ctrl-F1), or Show Tabs and Commands (show the whole Ribbon).
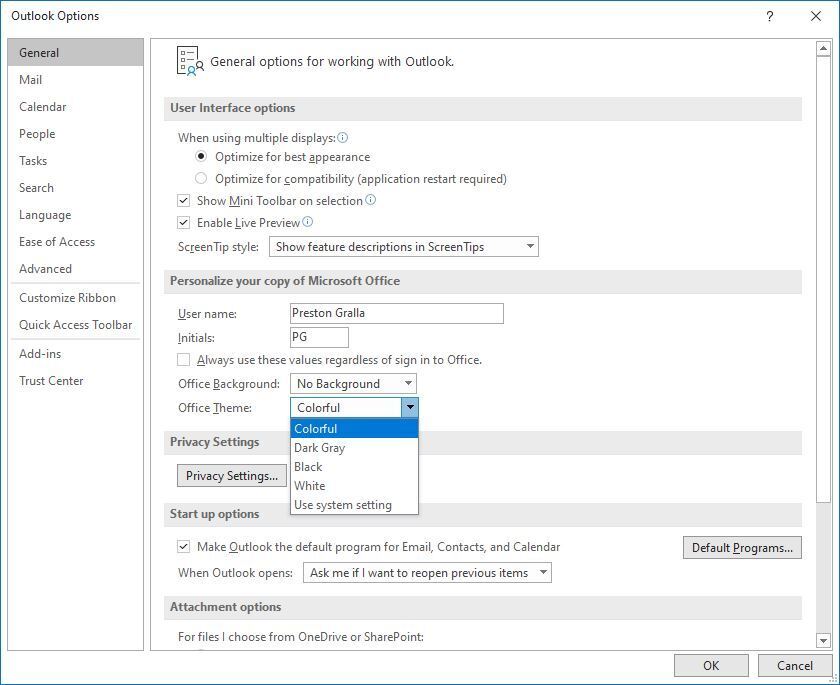
And if for some reason the blue color on Outlook's title bar is too much for you, you can turn it white, gray, or black. To do it, select File > Options > General. In the "Personalize your copy of Microsoft Office" section, click the down arrow next to Office Theme, and select Dark Gray, Black, or White from the drop-down menu. To make the title bar blue again, instead choose the Colorful option from the drop-down list. You can also choose to have the theme match your overall system settings by selecting Use system setting.
Just above the Office Theme menu is an Office Background drop-down menu — here you can choose to display a pattern such as a circuit board or circles and stripes in the title bar.
 IDG
IDG You can change Outlook's blue title bar to gray, black, or white: In the "Personalize your copy of Microsoft Office" section, click the down arrow next to Office Theme and pick a color. (Click image to enlarge it.)
Use the Search bar for more than searching emails
The search bar at the top of Oulook is deceptively simple-looking. You likely assume you can use it for searching through your emails and that's it.
But the search bar does double duty: you can, of course, use it for searching, and it can also help you find any Outlook capability, no matter how hidden, even if you've never used it. (This hands-on help capability replaces the Tell Me feature found in Outlook 2016 and 2019.)
To use it, click in the search box, and then type in what task you'd like to do. (Those who prefer keyboard shortcuts can instead press Alt-Q to get to the search box.)
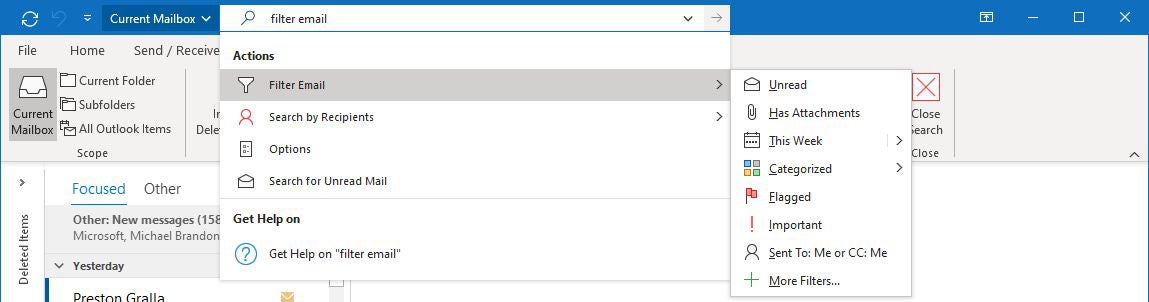
For example, if you want to filter your mail to see only messages with attachments, type in filter email. In this instance, the top result is a Filter Email listing with an arrow to its right, indicating that it has many options. Hover your mouse over it, and you see multiple options for filtering your mail, including Unread, Has Attachments, This Week, and others. Choose the option you want, and the task will be performed instantly.
 IDG
IDG You can use Outlook's search bar to perform just about any task. (Click image to enlarge it.)
For the most common basic tasks, you won't need this capability. But for more complex ones, it's worth using, because it's much more efficient than hunting through the Ribbon to find a command. It also remembers the features you've previously clicked on in the search results, so when you click in the box, you first see a list of previous tasks you've searched for. That makes sure that the tasks you frequently perform are always within easy reach, while at the same time making tasks you rarely do easily accessible.
Do online research from right inside Outlook
Sometimes emails are just quick notes that don't require much research, and you can toss them off with little or no thought. Other times, though, you'll want to include relevant information before sending them off. Those are the times you'll appreciate being able to do online research from right within Outlook. You can do this while you're writing an email, so you won't have to fire up your browser, search the web, and then copy the information or pictures to your message.
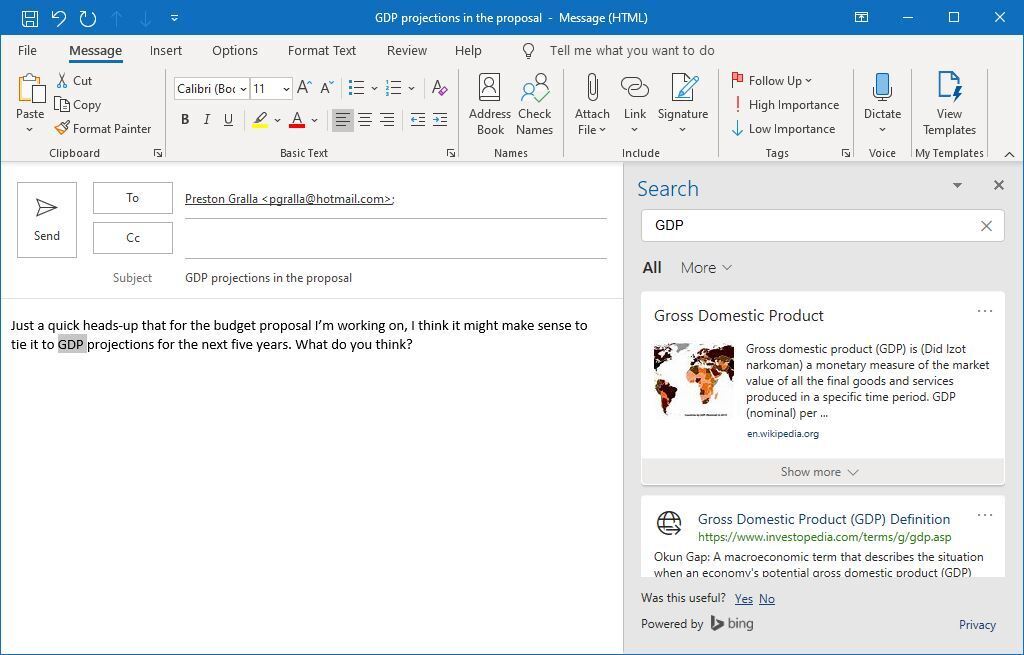
To do it, highlight a word or group of words in an email — it can be a new draft, a message you've received, or one you've already sent — and select Search from the menu that appears. Outlook then uses Bing to do a web search on the word or words, displaying definitions, related Wikipedia entries, pictures and other results from the web in the Search pane that appears on the right.
 IDG
IDG You can do web research from right within Outlook. (Click image to enlarge it.)
To use online research in Outlook or any other Office app, you might first need to enable Microsoft's intelligent services feature, which collects your search terms and some content from your documents and other files. (If you're concerned about privacy, you'll need decide whether the privacy hit is worth the convenience of doing research from right within the app.) If you haven't enabled it, you'll see a screen when you click Search asking you to turn it on. Once you do so, it will be turned on across all your Office applications.
Get a more focused inbox
If you're like the rest of the world, you suffer from email overload. Your most important messages are mixed in with the dross of everyday email life — retailing come-ons, groups begging for donations, pointless newsletters and more.
Focused Inbox helps solve the problem. Using artificial intelligence, it determines which messages are most important to you and puts them into a Focused tab, while putting everything else into an Other tab. That way you can spend most of your time handling important messages in the Focused tab, only occasionally checking the Other tab.
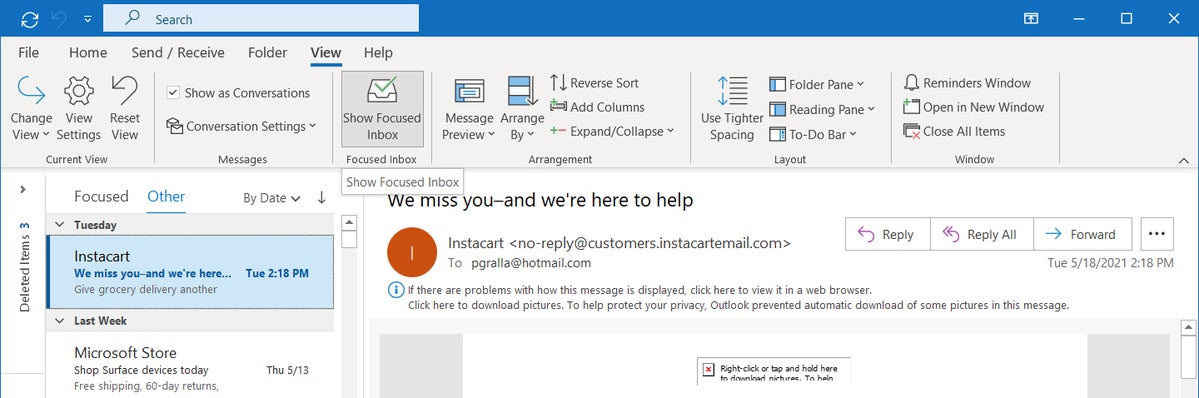
To turn on Focused Inbox, select the View tab from the Ribbon, then click the Show Focused Inbox icon. From now on, you'll have two tabs in your Inbox, Focused and Other. The Focused tab should have the most important messages, and the Other tab should have less important messages. If that's not the case, you can manually move messages from one folder to the other and tell Focused Inbox to automatically filter them in that way in the future.
 IDG
IDG Turning on Focused Inbox puts less important emails out of your way in the Other tab. (Click image to enlarge it.)
To move a message from one tab to another, right-click the message you want to move, then select Move to Other or Move to Focused, depending on where you want the message moved. That will move the message just this once. If you want to permanently route all messages from that sender to the other tab, choose either Always Move to Other or Always Move to Focused.
Focused Inbox isn't for everybody. If you find that Focused Inbox hinders more than it helps, you can toggle it back off by selecting View > Show Focused Inbox.
Keep email messages out of the way but handy with the Archive folder
Outlook has long offered email message archiving — that is, the option to move messages out of your Outlook mailbox and into a separate PST file as a space-saving measure. Corporate versions of Office, such as Office 365 for Enterprise, offer their own archiving features that automatically archive users' older messages, again to save space. These methods remove the messages from the user's Outlook mailbox. You can still get them back, but it takes some doing.
There's another option in Outlook for Microsoft 365: You can move specific pieces of mail out of your inbox or other folders and into the Archive folder. That way, when looking for a message, you can browse or search the Archive folder and find the message more quickly.
Using the Archive folder doesn't reduce the size of your mailbox; it simply helps tidy up your inbox while keeping older messages instantly accessible. Microsoft recommends that you use the Archive folder to store messages that you've already responded to or acted on.
If you already have a system of folders and subfolders in Outlook, you might not need the Archive folder, but it can be a boon for those of us who tend to leave everything in the inbox. And even if you do have a folder system, you might find that not all of your email fits neatly into your folders and subfolders; you can move these messages to the Archive folder to keep your inbox clean.
To move messages to the Archive folder, first select one or more that you want to archive. (Select multiple messages by holding down the Ctrl key and clicking each one you want to select.) With the message or messages selected, go to the Ribbon's Home tab and click Archive in the Delete group, right-click the message or group of messages and select Archive, or simply drag the selected message(s) to the Archive folder. You can also move an individual email to the Archive folder by pressing the Backspace key when the message is highlighted or when you're reading it.
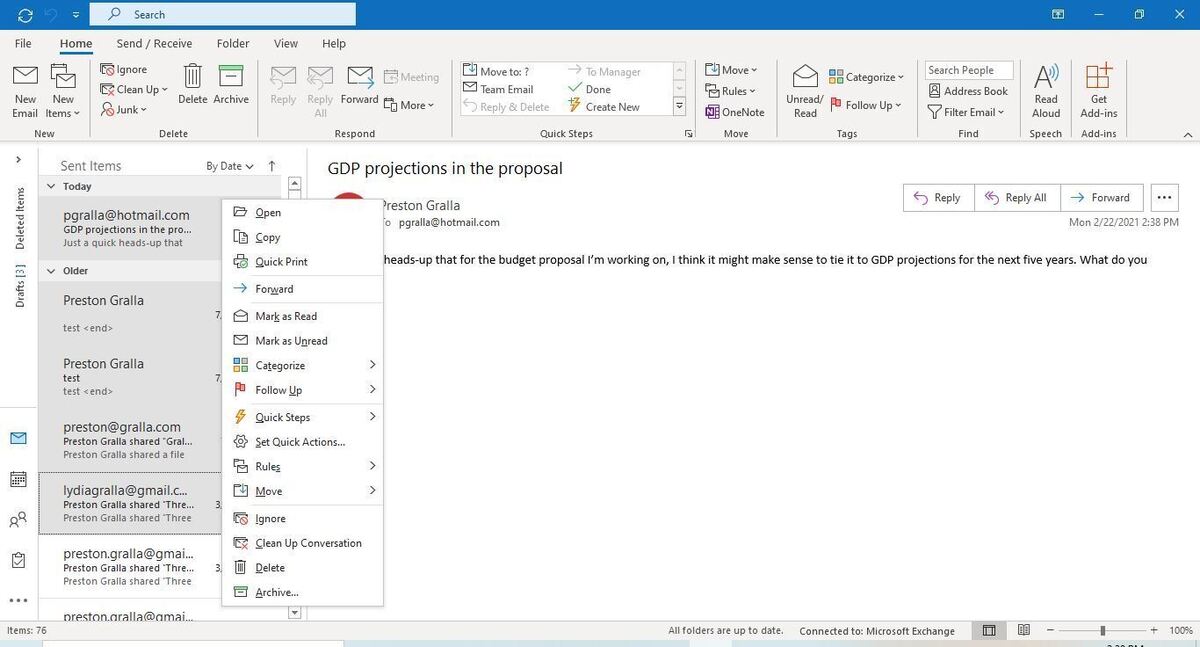 IDG
IDG Choose the last item in the pop-up menu to move the selected messages to the Archive folder. (Click image to enlarge it.)
Now when you need to find a message, you can browse the Archive folder or else go to the Archive folder and launch a search.
To move a message out of the Archive folder to a different folder, simply drag it to its destination.
How to Remove Email Account From Outlook 365
Source: https://www.computerworld.com/article/3625505/outlook-for-microsoft-365-office-365-cheat-sheet.html
0 Response to "How to Remove Email Account From Outlook 365"
Post a Comment