How to Fix Enter Network Password Credentials in Windows 10
If you have more than one personal computer on same network, file sharing between computers is very easy for you. Now, if you want to use this feature you have to enter certain Network credentials (which protects the files of the computer from falling in wrong hand). But some of the Windows 10 and Windows 11 users are reporting to have an issue as they are facing 'Enter Network Credentials Access Error' when they are trying to access the files on another computer on the same network.
Now, the reason behind this error can be simply wrong username or wrong password or it may be an ip mismatch. Here are working solutions to fix this problem straightaway.
Fix-1 Changing Windows Credentials
Credential Manager is a control panel utility that manages your logon information for websites, networks. Adding the N etwork name/address, username and password can solve the problem. Follow these steps to add network name/address, username, and password-
1. Click on the search box just beside the 'Windows button', and type "Credential Manager" and click on Credential Manager.
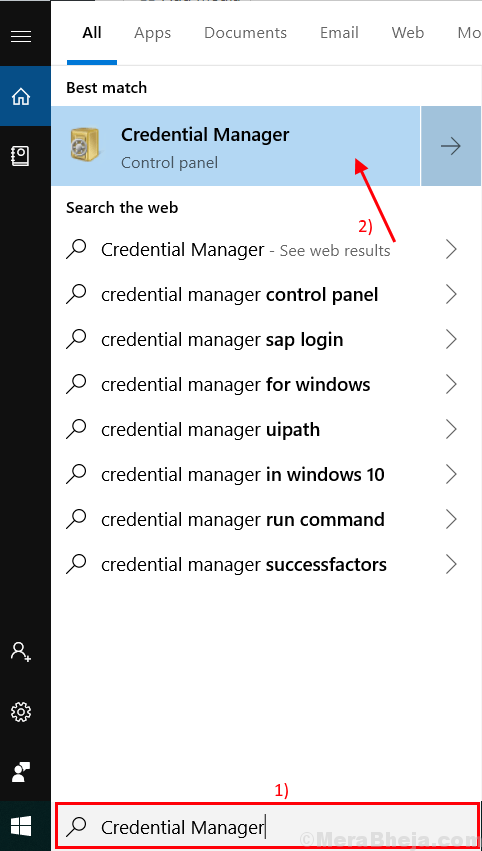
Credential Manager window will open.
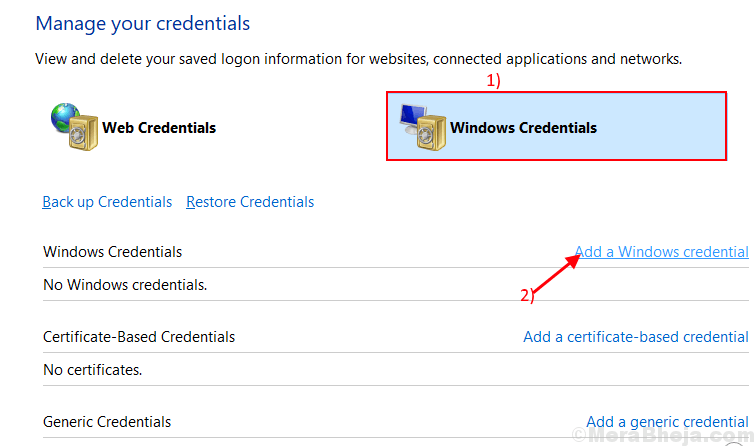
2. Click on "Windows Credentials" and then click on "Add a Windows credential".
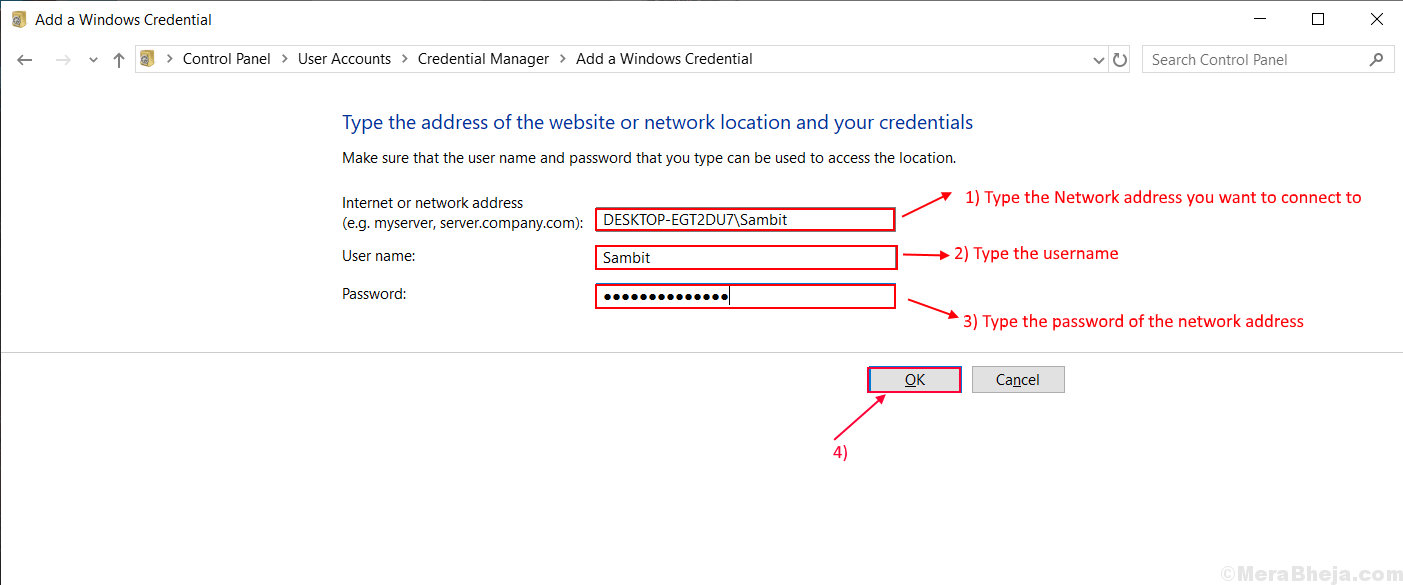
3. Now, type the Network address you want to connect to in the box beside the "Internet or network address (e.g. myserver, server.company.com):".
4. Just under that option, type the Username of the network you are trying to access in the box beside "Username:".
5. Type the password of the network address in the box beside "Password:".
6. Don't forget to click on "OK".
Close the Credential Manager window.
Restart your computer. Now try to access the network again. If the error is still there go for the next fix.
Fix-2 Turning off Password Protected sharing-
Sharing, accessing, or transferring the files from another computer to your computer on the same network requires a password. Turning "Password protected sharing"OFF can solve the 'Network Credential Access Error'. But before moving ahead to the steps of the process, let's be clear that Password protected sharing is the safest way to transfer your files or to access the network. Removing password protection can make your computer vulnerable to other users on the same network. Follow these steps to turn off "Password protected sharing" –
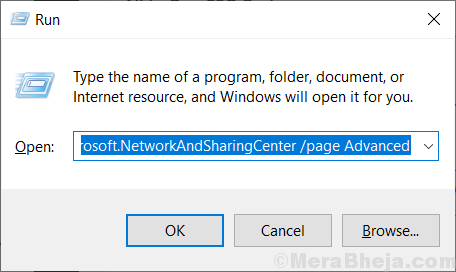
1. Press Windows key +R to open Run.
2. Then, copy-paste this line "control.exe /name Microsoft.NetworkAndSharingCenter /page Advanced"and hit Enter. Advanced Sharing settings window will open.
3. In the Advanced Sharing settingswindow, click on "All Networks".
4. Under "Password Protected Sharing" option, select "Turn off password protected sharing".
5. Click on "Save Changes".
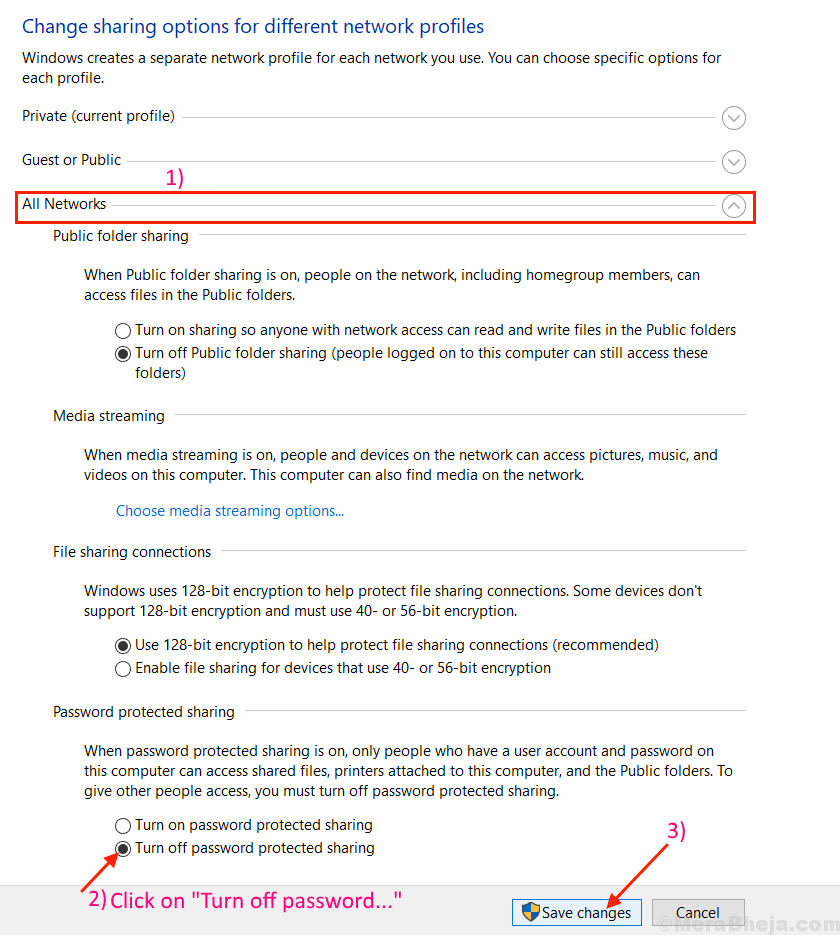
Close Advanced Sharing settings tab. Restart your computer and try to reconnect. If the issue still persists go for the next fix.
Fix 3: Using your Microsoft account
Try using your Microsoft username and password instead of a Local Account as it fixed the problem for some users.
Fix 4 – Change the computer name of the computer you are trying to connect
Try changing the computer name of the computer you are trying to connect as it has worked for some users who stated that changing the computer name of the PC whom they are trying to connect and then trying again seemed to solve the issue for them.
Fix-5 Changing your IP configuration
IP or Internet Protocol is a set of instructions which is followed by interconnected network devices. Now, if the IP is not configured properly then you can face 'Network Credential Access Error' when you are trying to access other computers on the same network. Follow these steps to configure your IP setting-
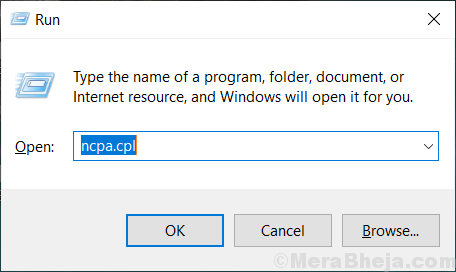
1. Press Windows Key+R to launch the Run window. Then, type "ncpa.cpl" in that Run window and press Enter.
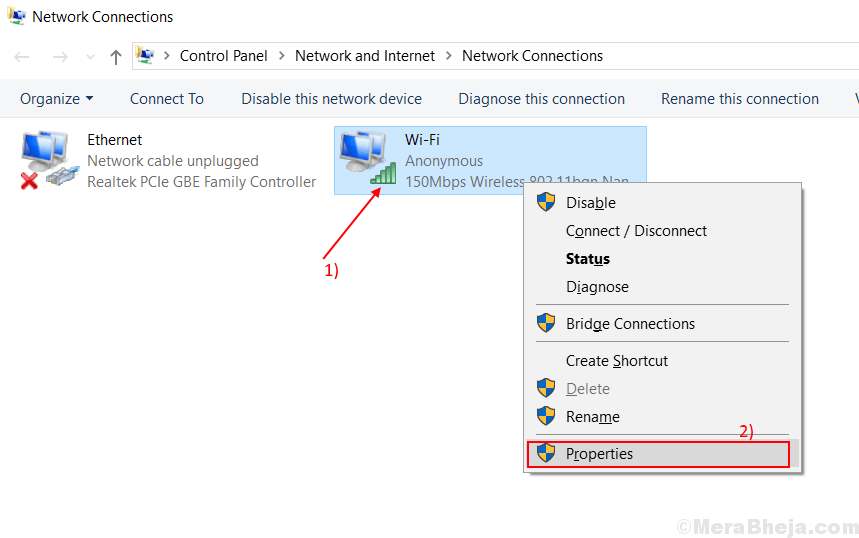
Network Connections window will open.
2. In the Network Connections window, right-click on the network connection you are using and click on "Properties".
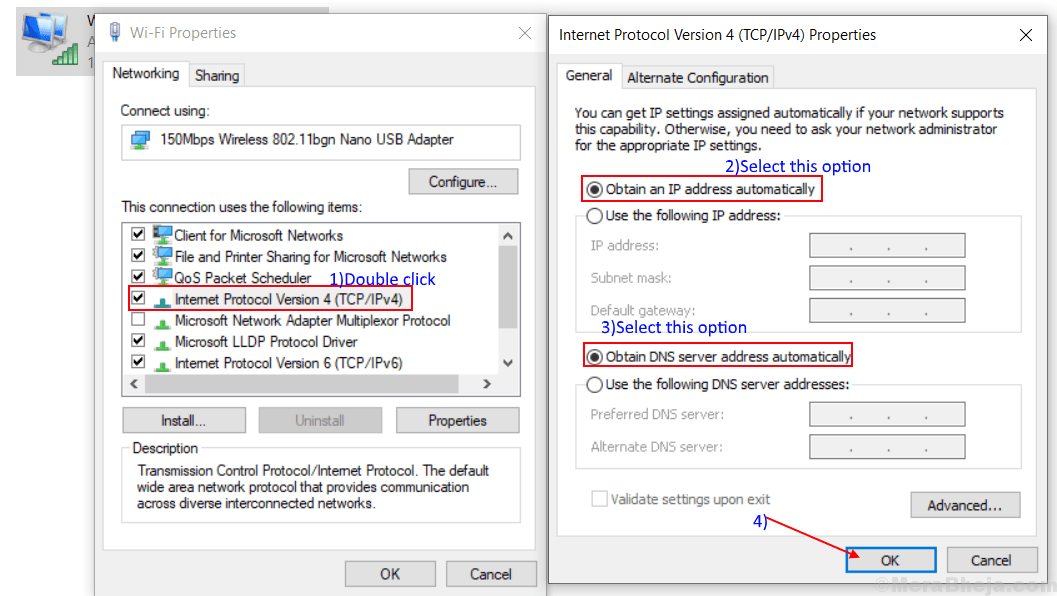
3. Look for the option "Internet Protocol Version 4 (TCP/IPv4)".
4. Double click on that option which will open the "Internet Protocol Version 4 (TCP/IPv4) Properties" tab.
5. Now, click on "Obtain an IP address automatically" and then click on "Obtain DNS server address automatically".
6. Finally, click on "OK" to save the changes.
Restart your computer. After rebooting your computer try to reconnect with the network. If you are still having the same problem go for the next fix.
Fix-6 Disable particular Security policy from Local Security Policy-
Sometimes some security policies can affect your access to the network which can cause the error 'Network Credential Access Error'. You can disable the particular policy which you are hampering access. Follow these next steps-
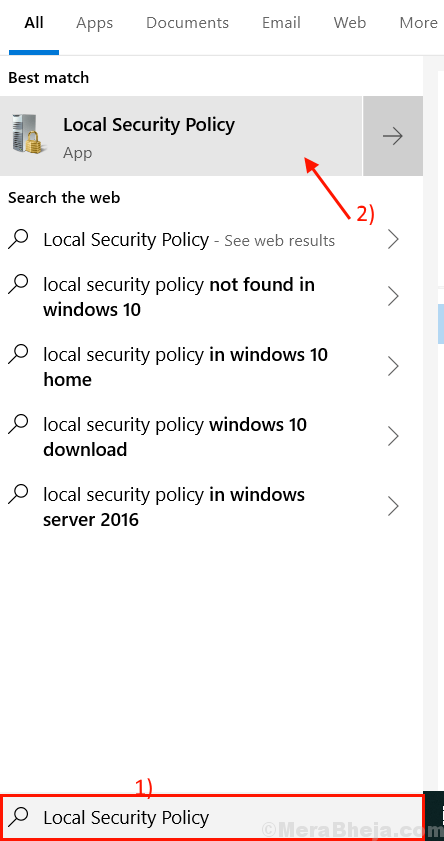
1. Click on the search box just beside the 'Windows button', and type "Local Security Policy" and click on Local Security Policy.
It will open the Local Security Policy window.
2. Click on "Local Policies" and then expand "Security Options" on the left pane.
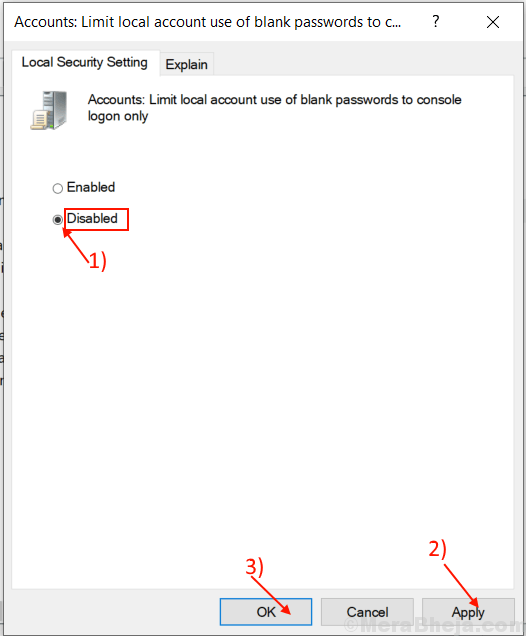
3. After that double click on "Accounts: Limit local account use of blank passwords to console logon only" on the right pane.

5. Select "Disabled" and then click on "Apply" and "OK". Close 'Local Security Policy'.
Restart the computer. Try to connect with the network again. If the error is still there, go for the next fix.
Fix 7- Disable Credential Manager automatic Startup
You can disable Credential Manager Service from S ervices window. It may solve the error. To disable Credential Manager Service follow these steps-
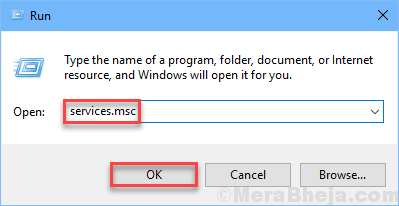
1. To open Run instance, press Windows key+ R from the keyboard.
2. Then, type "services.msc" and hit Enter from your keyboard.
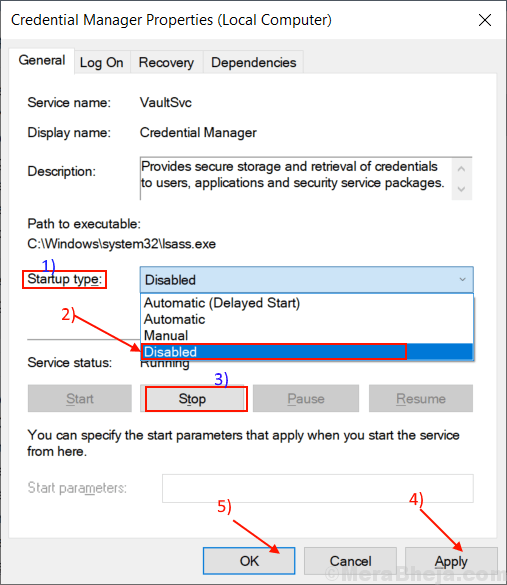
2. Now, look for the "Credential Manager" service. Double click on "Credential Manager".

3. Click on "Startup type:" and select "Disabled" from the drop-down and then you have to click on "Stop".
4. After that, click on "Apply" and "OK".
Close the 'Services' window.
Restart your computer. Try to connect with the network again, you will be able to connect with the network. If you can't then go for the next fix.
Fix 8 – Use your Windows Credentials
Try to use your username and password (which you use at the time of login) to access the network. It may solve the problem. Though if you are using PIN or Windows Hello to log in to the computer, you have to have a password with which you have logged in to the system. Type the account name you are using as the Username, and type your password in the Password box. This will solve your problem.
If the problem is still present, go for the next fix.
Fix 9 – Try Computer Name and account name as the Username-
Use the Computer name and account name in the same field of Username. This process can help you to remove ' 'Enter Network Credentials Access Error'. Let's take an example to understand the point.
Suppose you want to access another computer with a c omputer name– Comp7, and suppose the account name on that computer is 'Sam81'. So, you have to write the Computer name and account name without any space in the middle as the Username. Then you have the type the password of that computer.
So, the Username- Comp7Sam81
Try to access the network again. If the problem is still there then go for the next fix.
Fix 10 – Change your Network Profile to Private-
Windows prevents the access of another network from your computer or vice-versa if your network profile is set as 'Public.' Setting it to the 'Private' will help as Windows will allow access to the network. Before going for these steps make sure you are not using any "Public" internet connection such as Hotel or Airport WiFi, which can make your files vulnerable.
Follow these steps to change your network profile to 'Private'
1. Click on Windows Icon in the Taskbar, and click on 'Settings' in the lower-left corner.
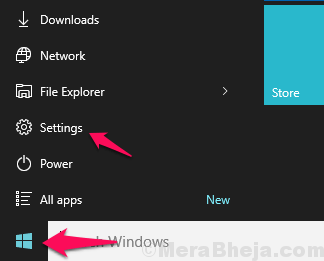
2. In the Windows Settings, click on the "Network & Internet" option.

3. In this window, click on "Change connection properties".
4. Now in this window, under Network profile, click on "Private". This will set your network profile as "Private". Close Settings window.
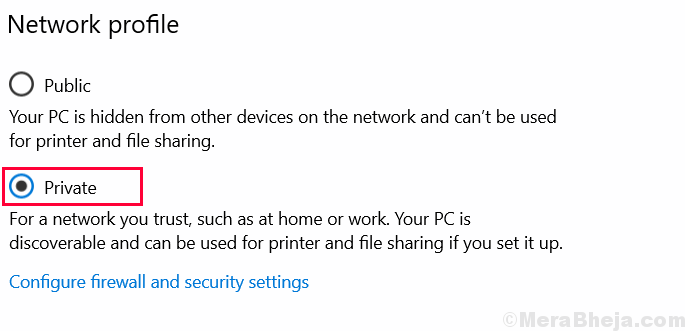
Try to reconnect your computer again with the network. Your problem should be solved.

Sambit is a Mechanical Engineer By qualification who loves to write about Windows 10 and solutions to weirdest possible problems.
How to Fix Enter Network Password Credentials in Windows 10
Source: https://thegeekpage.com/how-to-solve-enter-network-credentials-access-error-in-windows-10-best-solutions/
0 Response to "How to Fix Enter Network Password Credentials in Windows 10"
Post a Comment